b:include data='blog' name='all-head-content'/> Stephanie B. Designs: 2008

Wednesday, November 26, 2008

Holiday Extravaganza Sale!


The holidays are here, and it's time for a HUGE sale! Now through December 1st, Stampin' Up! is offering special product bundles at up to 50% off! There are some awesome bundles available - chipboard, tags, embossing, scrapbooking, holiday - you MUST check it out! You can view the link HERE, or you can check out more details on my business website HERE

Also, if you're looking for some creative and simple ideas for holiday gifts and projects, click HERE! Lots of great ideas and supply lists for things you can make for friends and family!

All bundles on sale are available in limited quantities. You can order through me, or through my website at the link above!


Tuesday, November 11, 2008

Fall Scrapbook Page


I know, I know. I've been slacking. I was doing so good at tending to my business, classes and keeping up this blog, and then it came to a screeching halt. I really have no good excuse, because while I don't have a lot of free time, I tend to waste the time that I do have. The craft room is too messy, I need to order more stuff, the house is a mess, the camera isn't working right, creativity block...all legitimate but lame excuses. I promise to do better, and I have some fun projects I'll be uploading over the week.

This is a Fall 6x6 scrapbook page my stamp club made last month. The pumpkins were fun to make, and you can make them as skinny or as fat as you want! Super easy!

Supplies used: Pumpkin Pie, More Mustard, Old Olive, Chocolate Chip and So Saffron cardstock, Hawaii Papaya Designer Series paper, wide Chocolate Chip grosgrain ribbon, photo corner and oval punches, silver brad and paper crimper.

Wednesday, October 1, 2008

BOO!


I love decorating for Halloween, so I thought I'd create something fun for my fireplace mantel using the new "Ghostly Greetings" designer paper and some wooden letters. It turned out pretty cute, although I must admit that it doesn't seem to have enough bling, so I'll probably dress it up a bit more. I have some ideas, like adding some jack o' lanterns or some stamped candy corn to the front....I'll have to think about it!

The wooden letters are about 6" high, and I got them from Joann's. I painted them black, then traced and cut out the letters. Added some ribbon, a stamped skull from "Batty for You", and a scalloped circle. Hmmm...maybe I'll add some more of those little guys from that set to this...

I will be offering this as a class on October 24th, just in time for Halloween. Cost is $15. For the first time, I will be offering this as a class-by-mail, so if you're interested and want this cute "BOO" sitting on your mantle this Halloween, let me know! Cost is $20, including shipping, and I will include all the pieces you need to put it together. I can even put it together for you if you prefer, just let me know! Ribbon and patterned paper used may vary slightly from what is shown.

Class details:
Date: Friday, October 24th
Time: 6pm
Where: My stamp pad!
Cost: $15
Class should last about 1 hour.

Supplies Used: Batty for You stamp set, grosgrain and patterned ribbons, Ghostly Greetings designer paper, wooden letters, black paint, scallop and circle punches.

Tuesday, September 23, 2008

A Man-Made Card!

I found this video over at StampingSchool.com.  I about died laughing, because this would SOOOO be my husband if I asked him to make a card. You just HAVE to watch it! Click on the link below:


If you haven't heard of stampingschool.com, go check it out! For a small annual fee, they offer fabulous video tutorials, templates and more!

Sunday, September 21, 2008

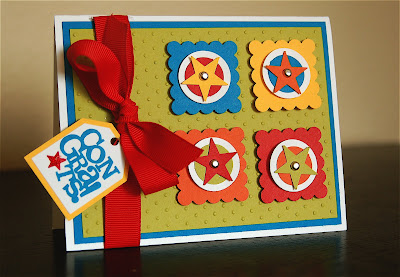
Colorful Congrats!


I made this card for the "Colors of the Rainbow" challenge on SCS. Check out the challenge here! I like the challenges on SCS because they inspire me to break out of my comfort zone and try something new. I'm usually not a huge fan of the bright colors, but this one was fun to make and I actually like it! I noticed after I took the picture that the red square is not exactly even - I fixed it, but I didn't want to retake the picture. So here it is, in all it's imperfect glory!

Supplies used:  Say it with Scallops stamp set, Kiwi Kiss, Tangerine Tango, Real Red, Pacific Point, Summer Sun and WW cardstock, Pacific Point ink, Real Red wide grosgrain ribbon, silver brads, scallop square, small star, tags and circle punches, dimensionals, Big Shot (with Cuttlebug embossing folder).


Saturday, September 20, 2008

Spooky Spider Candy Jar


Isn't this Halloween candy jar adorable? It is made using "Spooky Spider" from the new Décor Elements line! You can find these inexpensive glass jars at Target or Wal-Mart. Apply the spider - for a large jar you will use the medium spider and have to trim his web a bit. Add some ribbon to the lid and some candy in the jar, and it's done! Spooky Spider is available in two colors and three sizes. It is available from now until October 31st!

Small Spider $5.95
Medium Spider $10.95
Large Spider $14.95

Download the complete flyer HERE!


Retired sets for sale and some news!

I finally have some free time and I plan on making some fabulous projects today! I will post those later, but first, some news!

Online Ordering!

Online ordering is now available! Yes, my fabulous friends, you can now place orders though my SU demo website, 24/7! So if you ever get the urge in the middle of the night to get that fantastic designer paper or stamp set, or you need to make some invitations but don't have time to have a workshop, you can place your order online and have it delivered right to your door! Just visit my demo website, click on Products, and start shopping! Cool beans.

Classes!

Many of my customers have asked me if I have any upcoming classes. I do have some new classes in the works and will have my schedule posted here in the next couple of days. I have so many ideas that it's hard to settle on just a few, but I know you're going to love what I come up with! Something new I plan to offer are project kits by mail, for my long-distance friends and customers that can't make it to my classes. I'll also be offering card sets and custom invitations. Watch for details soon!

Retired Sets!

I have just reorganized my craft space, and I need to make room for some new stamp stuff! I have the following retired sets available for sale. I hate to part with some of these (especially that Carved & Candlelit set), but I hope to find them a good home! If you are curious as to what the sets look like and to see some samples, check out the SCS gallery HERE. Scroll down and you can search for the set by name, and view hundreds of project ideas! If I need to ship any of these, it will be $3.95.

Here is what I have available (UM = Unmounted):

Hung Up on the Holidays $8.00
Birthday Best $8.00
Halloween Backgrounds $5.00
Carved & Candlelit $15.00
Looks Like Spring (I have a matching punch as well, that would be $10 extra)   $15.00
Canvas Background  $8.00
Big Blooms $10.00
Big Blossom  $5.00
Send a Celebration $8.00
Blooming with Happiness $8.00
Springtime Stems $5.00
Stars & Swirls $5.00
Faith & Hope $10.00
So Very (UM) $8.00
Love Matters $15.00
Monkey Business $15.00
Petite Patterns $5.00
Fresh Fillers $5.00
Brighter Tomorrow $10.00
Sidekick Sayings $10.00

Let me know if you're interested in any of these and I'll get them to you ASAP. Now go stamp something! :)


Thursday, September 11, 2008

Remembering Sept. 11, 2001


No projects today, no warm and fuzzy ramblings. Just some thoughts and reflections about 9/11.

I'm not one to remember the details of past events. In fact, I probably couldn't tell you what I had for breakfast yesterday, or the name of the last person I spoke with on the phone. But I can recall everything about September 11, 2001. Even what pajamas I had on that morning (white with blue sheep).
I remember being woken up by the phone ringing around 6am. Chris (my husband) answered it, and then bolted up in bed. It was a call from the fire department, ordering him in because our country was "under attack". He told me to turn on the television, and we saw the WTC on fire. Soon after that, we watched as the second plane hit the second tower. He immediately left for work, and I sat there on the bed all day, glued to the television. I felt helpless as I watched the towers burning, people jumping to their deaths, and reports of those not able to evacuate. Then I watched in horror as the towers fell, the Pentagon was hit, and flight 93 went down in Pennsylvania. I felt like I in a nightmare that I couldn't wake up from. I was terrified for all those people, heartbroken for those that were searching for their loved ones, worried about my own family, and for my husband. I remember gathering up emergency supplies, just in case. It was a day I'll never forget.

In the end, 2974 people lost their lives as a result of the attacks, including 343 FDNY firefighters who gave their lives to save others. Another 24 people are missing and presumed dead.
Chris attended the public memorial for all the fallen firefighters and spent several days visiting FDNY stations, including those that lost their entire crews. He came back a changed person. I visited Ground Zero less than a year after the attacks. I had seen it a thousand times on television, but it was an entirely different experience to see firsthand the destruction of that day. There are no words to describe the emotions I felt that day.

We promised we would never forget. I never will.

Sunday, September 7, 2008

Halloween Treats!

Halloween is right around the corner! I love everything about Halloween - the colors, the costumes, the parties, and most of all, the treats! My stamp club wanted to create some projects with a Halloween theme, and I was happy to whip up some fun stuff using SU's new Ghostly Greetings designer paper, the Batty for You stamp set, a few punches, and the new Big Shot!


Isn't this Frankie treat box the cutest thing ever?! I got the idea from Dawn Griffith's Frankie card. Check out her blog here! Instead of making a Frankie card though, I turned him into a treat box instead! This is just a simple 2-4-6-8 box. After taking this picture, I realized that Frankie needed some "bolts", so I punched two small circles out of grey cardstock and adhered them to each side of the box.


I cased this card from scrappindixie on SCS. I changed around the colors, stamps and ribbon, but it's her layout! I embossed it with a Cuttlebug folder in the Big Shot machine.

This scrapbook page layout I cased from Michele Force. Check out her blog here!

Supplies used on all projects: Batty for You stamp set, Pumpkin Pie, Old Olive, Lovely Lilac (on Frankie), black and Whisper White cardstock and inks, circle, scallop and photo corner punches, Ghostly Greetings designer paper, Old Olive 1/4" grosgrain ribbon, silver brads (on Frankie), white gel pen, Cuttlebug embossing folder, Big Shot machine, black marker.

Monday, July 28, 2008

3x3 Box and Cards


I made this box for the 3D060 challenge on Splitcoaststampers. The challenge was to make a 3x3 box using only SU products, but I did use non-SU flowers and brads. I'm such a rebel. You can find an easy pattern for this on Elaine's blog HERE!

I embossed the swirl from the Baroque Motifs set. The more I look at this the more I wonder if I should have embossed on vanilla instead of red, but I suppose it's good to walk on the wild and bold side every now and then! The colors I used are Certainly Celery, Black, and Riding Hood Red - one of the new In Colors that will be available in the new 08-09 SU catalog.  I've made a few of these boxes to have on hand as hostess gifts. Addicting little things, they are! (If you want to see more detail/larger view, just click on the pictures).

The box above is SU only, and I made it for my upline, Beth. I was going for clean and simple, and I love the Soft Sky and Chocolate Chip together. I'm really going to miss this blue when it's retired in a couple of weeks! The box holds matching 3x3 any-occasion cards. Hope she likes it!

Wednesday, July 23, 2008

SU Color Combo Tool

I came across this online color combo tool created by Laura on Splitcoaststampers.com. It's a pretty cool website that generates color combos of all the SU colors. You can start with one color or several, and the system will generate matching color combinations for you! It's a great tool for those of us who are a little color combo challenged (like me). Check it out below! You can also find this tool permanently located in the links section of my blog. Enjoy!

Tuesday, July 22, 2008

SU! Announcement - Online Ordering!

SU just announced that beginning something this fall we will have an online ordering system! I've had several customers ask me if they can place their orders online, so I'm very excited that I will be able to offer them this option! Customers will be able to order directly from my website or SU's website. I will announce more details as they become available!


Saturday, July 19, 2008

CD Holder and Tutorial

cd holder


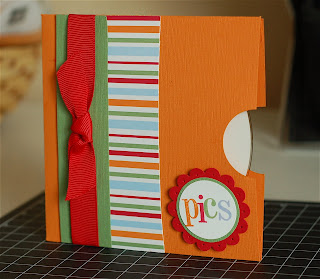
This CD holder is one of the projects my stamp club will be making this month. I often make music and picture CD's for friends and family, so this will be a nice way to turn them into pretty gifts instead of just sticking them in generic jewel cases or paper sleeves. Want to make your own? Here are the supplies you'll need:

Sheet of 8 1/2"
8 1/2" x 11" cardstock
Sticky Strip
1 3/8" circle punch
Scissors/Paper Trimmer
Bone folder

Step 1:  Trim your cardstock to 10" x 6". Score at ½” along each 10” side. Turn your cardstock 9o degrees (so that the 10” side of the paper is butted up to the top of your paper trimmer) and score at 5”.  Fold with a bone folder.


Step 2:  Trim off the the small flaps at the top and bottom left side of your cardstock. If you're using textured cardstock, it's important to make sure that the texture is face down. Your cardstock should look like this:


Step 3:  Apply sticky strip to the inside of the small flaps on the right hand side, as shown below. Fold the left side of the cardstock over, securing it to the sticky strip. You should now have a pocket. 


Step 4:  Take your 1 3/8" punch and punch a half circle in the middle of the open side of the pocket, as shown below. Now all you have to do is embellish it!


Supplies used: Summer Days Simply Scrappin' kit, 1 3/8" circle punch, red wide grosgrain ribbon.

Friday, July 18, 2008

Pocket Card Holder Set


pocket card
I just got the Lovely Letters alphabet set, and I'm so happy that I did! I actually earned this set for free when Suzanne joined my downline. :) Anyhoo, it makes beautiful monogrammed cards, so will come in handy when I need to whip up some pretty personalized cards for someone!

Isn't this little notecard set cute? I made it for my stamp club hostess this month. I got the idea from Jamie's blog, Chic n' Scratch. Check out her pocket card video tutorial HERE!

The notecards are 3x3 and include envelopes. To make the holder, I traced a circle around a 6" plate and cut it out (It would probably be quicker and easier if you use a Creative Memories cutting system or the Coluzzle). Fold the bottom up and sides in. Place three cards and envies inside (it's important that you do this before you put the belly band on). Wrap a belly band around it and embellish away! I hadn't used my Cuttlebug in a while, so I dusted it off and used it to emboss the swirls on the cards. This project uses very little paper and supplies, and they're so fun and easy to make!  Here are the supplies and dimensions:

Chocolate Chip - one 6" circle
Soft Sky, Groovy Guava, Wild Wasabi - one 3 x 6" piece each, plus small pieces for the scallop and circle punches
Afternoon Tea Designer Series paper - one 1" by 7 1/2" piece
Whisper White - small pieces for the monogram
(3) Whisper White Mini Square envelopes
Groovy Guava Stitched ribbon
Chocolate Chip Ink
Lovely Letters alphabet set


Friday, July 4, 2008

Not just cards and scrapbooks anymore!

Introducing Decor Elements, a new addition to Stampin' Up!'s Definitely Decorative product line! Now you can easily personalize your surroundings with a variety of exclusive images and expressions designed to create a customized, unique space. The self-adhesive vinyl images are easy to apply and remove, and are a quick and affordable way to decorate your home!

I'm particularly fond of the Manhattan Flowers - those will definitely wind up gracing the walls somewhere in my house!  Check out Decor Elements brochure HERE!

Friday, June 27, 2008

Summer Fun 12x12 Scrapbook Class


Here is the layout we'll will be creating in my scrapbook class this evening. I like how it turned out! The layered, "spinning" star was created very easily using the large and small punches. Check out this simple tutorial by Dawn on how to make them! I'm loving these star punches and I can see myself using them for many different occasions.

The photo corners punch is another punch that I can't believe I waited so long to get. I like how you can layer the corners with patterned paper for different looks!

What I like most about this layout is that it can feature up to 11 pictures, which is nice when you have a ton of pictures of one event. You can rotate the page, move or eliminate some of the photo mats for a completely different look. You can also use one of the smaller mats for journaling in place of a picture. I like versatility! So what do you think?

Supplies used: East Coast Prep DSP, Real Red, Tempting Turquoise, More Mustard and Wild Wasabi ink and cardstock, silver brads, photo corners punch, 3/4" and 1/2" circle punches, large and small star punches, grosgrain and stitched ribbon, Stickles.

Friday, June 20, 2008

New Class Layout!


This is a picture of the layout we'll be doing at my next scrapbook class on Friday, June 27th. Now I know you're wondering where all the bling is - don't worry! I know the pages above don't have any embellishments or stamping, but I promise that the ones you create will! I don't have all the supplies yet to put together the pages we'll actually be making, so this is just an IDEA of what the layout will look like. We will also be using slightly different colors: Real Red, More Mustard, Tempting Turquoise and Wild Wasabi. We'll also be using the East Coast Prep Designer Series paper, and doing some fun stuff with a couple of star punches. I wanted to do a 4th of July theme, but I was struggling with my colors a bit, and I wanted something a little more summery. I'm pretty sure you'll be happy with what I came up with - and I think it will work for those July 4th pictures!

The class is Friday, June 27th at 6pm. Cost is $12 a person, and is limited to 10. Please let me know by Wednesday, June 25th if you'll be able to make it so that I can have enough supplies ready. This class is a quick one and should take no more than an hour or so!

BTW, I got the inspiration for this layout from Stacey King. You can check out more of her scrapbook layouts and creations here!

Thursday, June 19, 2008

6x6 Scrappin'


This is a springy/summery scrapbook page I created for one of my stamp clubs this month. Every month, in addition to a card or other project, we create a 6x6 page. The goal is at the end of the year everyone will have a nice album to keep or give away as a gift! Some of the months are themed, others are more generic. This one features my daughter Hayley when she was just two years old. I remember the day just like it was yesterday! Chris, Hayley and I decided to take a walk through the nearby Santa Rosa Plateau. We were a little unsure of how Hayley would handle the long walk. She had so much fun running along the trail and exploring nature. Near the end of the walk she ditched her shoes and ran around barefoot. It was a wonderful day! However, I noticed that I got the year wrong in my journaling - it should read 1998!

I try to teach a new technique every month. On this one I demonstrated how to use the SU corner rounder to make a nice scalloped edge, and how to make "faux eyelets" using a paper piercer and a white gel pen. Click here for a quick and easy tutorial by Beate Johns on how to make a scalloped border using the SU corner rounder. You can also check out more of her cool tutorials and artwork on her awesome blog!

To make the eyelets, you simply pierce a hole in the paper using a paper piercer and the SU Mat Pack (makes it SO much easier!), then go over the hole with the white gel pen. Voila - instant "eyelets"!

Supplies used: Doodle This stamp set, Old Olive, Chocolate Chip, Rose Red and Vanilla cardstock, Chocolate Chip and Old Olive inks, Flower Fusion felt flowers, white gel pen, grosgrain ribbon, and rhinestone brad (non SU).

Saturday, May 10, 2008

Recipe Box Class

recipe box
This is the recipe box we made at my class last night. I cased the design from Kristina - check out her blog at kwernerdesignblog.com! I used the Fall Flowers paper on this one, and since the paper is double sided, everyone got creative with the patterns they used. We also created four embellished index cards for the inside. This was a relatively easy project to put together, and everyones boxes turned out so nice! Someone came up with the idea to use these as coupon boxes instead, which is great because these tins are the perfect size for coupons! I'm giving mine to my mom for Mothers Day. I plan on doing a similar class in the future, except I'll be using the larger lunch box tins instead to accommodate cards.

Supplies used: Fall Flowers DSP, Simple Serif mini alphabet, Really Rust and Old Olive cardstock, scallop, 1" circle and corner rounder punches, metal edge tag, Old Olive wide grosgrain ribbon, Old Olive Stampin' Write marker, dimensionals and sticky strip, Maya Road Coffee Break tin (purchased online from California Paper Goods).

Wednesday, April 23, 2008

You MUST see this!

I was surfin' around on the web, looking for ideas for a scrap space, and I came across the holy grail of all scrappin' spaces - Connie's scrappin' shed!


You can see the inside of this awesomely wonderful, amazing scrap space by clicking HERE. I've seen some really nice scrap spaces out there, but this one is by far the most drool worthy! Connie's fantastic husband built this scrappin' shed for her, and even some of the furniture inside. That is pure love, people. I can only hope to someday have a similar little piece of heaven in my backyard. When I mentioned it to my husband, he replied that I should be happy I'm getting grass and a dog run.  A girl can dream, right?

You can check out Connie's blog HERE.


Friday, April 18, 2008

Two New Classes for May!


I know I have been promising classes for a while now, and I've been so busy with life (and somewhat lazy) that I've been putting it on the back burner. Well ladies, I've finally got my act together and I am happy to announce that I have two classes scheduled for May! I am really excited about these two projects, and I just KNOW you're going to LOVE them!

The first class project is a recipe box tin. This would make a unique and special gift for Mothers Day! I am still working on my sample and will post it as soon as I have it ready. To give you an idea until then, the box will be very similar to the one show above created by Kristina Werner. I'm a huge fan of her work and her recipe box inspired me to do this class! Check out her blog at kwernerdesignblog.com.

This class will be held on Friday, May 9th at 6pm at my home in French Valley. The class is $25, and will include the tin and all materials. We will also be making index cards for the inside of the box. This class is limited to 10, so RSVP soon to reserve your spot. Pre-payment of the class fee is required. Please visit my Stampin' Up! website HERE for more details!

My second class will be held on Friday, May 30 at 6pm. This is the Tart & Tangy Class! Sweeten up someone's life with this fun, fresh set of 10 thank you cards packaged in a custom-designed box. Makes a perfect gift for a friend, a loved one, or just for yourself! Here is what we will be making:

tart and tangy


This class is $25, and will include all supplies to make the box plus 10 cards and envelopes. Also, if you think this is as cute and adorable as I do and would like to create more cards and/or scrapbook pages at home, I will be offering 20% off the Tart & Tangy stamp set and Summer Picnic Designer Series paper used in this project! That's right - MY discount. This offer is available to class participants only. Does it get any better than that?? I don't think so. :) This class is limited 10, so again, RSVP soon to reserve your spot!

If you are not local or you are unable to make either of these classes, I can offer a class kit-to-go. You will receive all supplies and instructions needed to create the projects above. Please add $4.95 to the class price for shipping. Contact me for more details!


Wednesday, March 26, 2008

Wild for Wasabi


I finally took advantage of the Wild for Wasabi promotion (check out that special HERE). I have to admit, I wasn't too crazy about this color at first, but it's grown on me and I find myself using it quite often! It's one of my favorite-est greens (almost more than my beloved Old Olive). It's also more versatile than its cousins, Garden Green and Glorious Green. My personal feeling is that Stampin' Up! should take a nation wide vote and do away with some of the dated, more unpopular colors (Blush Blossom, anyone?) and replace them with some of these fabulous, more loveable In Colors, but that is a rant for another day.

Anyhoo, I got this mini-book idea from the Wild for Wasabi project sheet (see above link for details). The instructions for putting it together were a little vague, but I improvised and this is how it turned out. The inside pages are blank and ready to be embellished. This cute little bugger is going to my stamp club hostess this month. I hope she likes green!

Supplies used: Wonderful Words stamp set, Wild Wasabi pre-cut, pre-scored cardstock, ink and stitched ribbon, Real Red, Pumpkin Pie and Whisper White, scallop and circle punches, Crop-a-dile, Stickles.

Wednesday, March 19, 2008

Easy Berry Bliss Projects


I'm a big fan of pink and brown together, so I'm just lovin' the Berry Bliss paper! Here are two recent projects I've created. Both were really quick and easy! The shower favors were for a friend's baby shower. The stamped image is embossed, but it doesn't really show in the picture. I cut 1" x 3" strips of Berry Bliss paper and wrapped them around Hershey Nuggets. The mini-book I made for one of my stamp club hostesses. I left the outside tag and inside pages blank so she can customize it. I bought the mini-books from a local scrap store that was going out of business, but it's basically just a 4x4 mini chipboard book. Hope you like!

Products used: Riveting stamp set (on shower favor), Berry Bliss Designer Series Paper, Scallop and Circle Punches, Purely Pomegranate, Chocolate Chip and Whisper White cardstock, grosgrain ribbon, Stickles, cellophane bags, Hershey Nuggets, mini-chipboard book.

Thursday, February 28, 2008

I'm Sailing Away....


As of tonight, I'm officially on vacation. That's right - no cooking, cleaning, carpooling, stamping or scrapbooking - although you know I'm going to take ton of pictures! We are going on a Disney cruise! We'll arrive in Florida tomorrow morning, and we'll sail away on Saturday. We'll be gone a blissful seven days, stopping in St. Thomas, St. Maarten and Castaway Cay - Disney's own island (shown in the picture above)! We've had this booked for three years, and the kids are over the moon excited. They will keep so busy on the ship - they have their own club and there are so many activities, I'm sure we'll hardly see them! 

I was really worried about even making this trip, because something came up on Monday evening, and not in the too busy, over-worked and over-scheduled suburban family kind of way. I mean in the stomach virus kind of way. I caught the lovely bug on Sunday at a baby shower - I know this because three other people came down sick too. Anyhow, I wanted to die during the hours between Monday and Tuesday, but by Tuesday evening I was feeling better. I sent the kids to my moms because I was afraid they would catch the bug too, since it's obviously very contagious. I stripped and cleaned everything and used about two cans of Lysol in and around the house. I even Lysol'd the dog - I couldn't take the chance.  So far, so good - noone is sick - yet. But I keep having nightmare visions of all my kids and maybe even my husband all barfing on the plane tonight. Wouldn't that be great? That would be such a Bowden family thing to happen!

Anyway...I've made some really cute projects, but I'll have to post them when I return. I just haven't had the chance to do it the last few days. To my customers, if you have placed any orders with me I will deliver them as soon as I get back!
Off to finish packing!!!

Thursday, February 21, 2008

Yummy Recipe of the Month (and kids dig it)!


I've decided to post a favorite recipe of mine every month, cause we have to eat while we're stampin' and scrappin', right? This one happens to me one of my favorite comfort food recipes, and my kids think I'm the coolest mom in the world when I make it for them.

So what do you get when you mix Captain Crunch Cereal with chicken strips? An absolutely fabulous, yummy appetizer or dinner! Friends go nuts over this recipe every time I make it, and it's super easy. I discovered it at a Planet Hollywood restaurant, and it was so good that I had to find the copycat recipe on the internet. It sounds like a weird combination, but it's seriously yummy! I like to fry mine in the deep fryer because I live on the edge like that, but for a healthier version you can "oven-fry" it instead. Both versions rock!

PLANET HOLLYWOOD'S CAPTAIN CRUNCH CHICKEN

2-1/2 cups Captain Crunch Cereal - do not use the one with pink berries - unless you want pink chicken. Eww.
1 cup corn flakes
1 egg
1/2 cup milk
1/2 cup flour
1 teaspoon onion powder
1 teaspoon garlic powder
1/2 teaspoon black pepper
2 pounds chicken breast, cut in 1-oz. tenders
Vegetable oil for frying (I actually use a deep fryer, but a pan works too)
 OR:
Heat the oven to 350 degrees and bake until done

HONEY-MUSTARD SAUCE (you can use this recipe, or just cheat and by prepared honey mustard - I like this version better).

1/2 cup mayonnaise
2 Tablespoon honey
1 Tablespoon prepared mustard

1. Coarsely grind or crush the two cereals and set aside. Beat the egg with milk and set aside.
2. Stir together the flour, onion and garlic powders and black pepper; set aside
3. Dip the chicken: pieces in the seasoned flour and coat well; shake off the excess flour. Dip in the egg wash, coating well, then dip in the cereal mixture, coating well.
4. Heat oil in a large heavy skillet to 325. (or skip this step and bake on a foil-lined sheet at 350 degrees until done)

Drop coated chicken tenders carefully in the hot oil and cook until
golden brown and fully cooked, 3 to 5 minutes depending on size.
Drain and serve immediately with sauce.

5. For sauce, combine all ingredients and mix well.

Yield: 4 to 6 servings.

Thursday, February 7, 2008

Sale-A-Bration is here!!!


It's Sale-A-Bration time again at Stampin' Up! and free stuff is what it's all about!

Every year Stampin' Up! gives customers, hostesses, and new demonstrators the opportunity to earn fantastic, FREE, limited-edition stamp sets they'll enjoy for years to come.

Here's how Sale-A-Bration works:

Customers
When you spend $50 on Stampin' Up! merchandise, you'll receive a free Sale-A-Bration stamp set. There's no limit - for every $50 you spend, you can select another free Sale-A-Bration set!

Hostesses
When you host a workshop of at least $300 (before tax and shipping), you'll receive a free Sale-A-Bration set in addition to all of the regular hostess benefits!

New Demonstrators
During Sale-A-Bration, anyone who joins as a demonstrator can choose any stamp set--a value of up to $47.95--from the Spring-Summer 2008 Collection catalog! PLUS, new demonstrators get 20 percent off the Demonstrator Starter Kit--over $350 of Stampin' Up! products and business supplies for only $159! How flippin' cool is that?! And as always, you can customize you demo kit. You can sign up through my website here!

The Sale-A-Bration promotion starts on February 1 and runs through March 17, so don't miss your chance to earn free products! Contact me to book your workshop or learn more about this promotion. If you haven't received the Sale-A-Bration brochure from me, you can view it online here.


Let's Sale-A-Brate!